Crafting is fun for all ages and interests. This blog evolved from researching resources for friends and articles I write as a freelance writer. It is a place to share the information I discovered. Please feel free to leave comments and questions. I am always looking at new projects ideas for family and friends in areas of my own abilities and theirs. As a notice to my readers this blog does contain Amazon links and Google Adsense. As an Amazon Associate I earn from qualifying purchases.
Showing posts with label Free Crochet Pattern. Show all posts
Wednesday, February 2, 2022
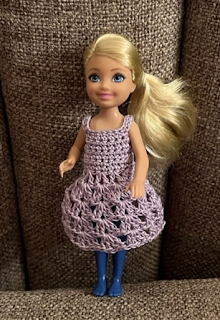
Chelsea Summer Play Set
Every so often I find a link to a pattern on a blog or website and while I'm there I look around to see if there is anything else that catches my eye, especially for the doll project. I found a pattern free pattern for a 4 inch Amelia Thimble doll here on a blog when I went to visit to find a baby doll pattern. I thought perhaps this might work for Chelsea Can Be a Builder Doll and put it on my to do list.
Pattern notes:
I made considerable changes to the pattern but I wouldn't have even thought about making the outfit without the starting point of this pattern.
The designer used size 30 cotton thread and a 1.1mm thread crochet hook. I changed to size 10 crochet thread and a 1.8mm hook.
I only used the dress portion of this pattern. I started with the first two rows which created the arm holes and determined I had a wonderful fit for the dress. The designer started the the skirt at row 4 leaving a high waist line. I chose to add 4 more rows to the top bringing the waist line lower as I wasn't adding pants to this project. I joined the top at the end of 8 rows.
I started with the designers V stitch pattern but swtitched to a 2dc ch1 2dc V stitch for row 2. If I make this again I'd begin with the 2dc V stitch as it makes the skirt a bit thicker. I continued with rows until the dress was just below knee length. After finishing the back I used a snap to close the dress.
Tuesday, September 8, 2020
Halloween House 2
I've been writing for some time now about my quest to create a starter Halloween village to go out with the Halloween box at the end of this month. I've only seen a few Halloween themed crochet house patterns and I've already made one of them. The other 2 I have require more construction than I have time to commit to this year. I have hopes that they might become part of next year's offering. However, with some creativity I realized Christmas actually is more promising for crochet houses than I'd realized.
One of the reasons I make such a point of noting where I find patterns when possible is I'm so grateful when someone leads me to a solution to a pattern hunt. Recently I came across a reference for a different pattern from repeatcraftme and thought I should check out the website. While there I came across something I'd never seen before a free pattern for a gingerbread house made all in one piece. If you read my blog at all you know I love to limit the amount of sewing I have to do so this really intrigued me.
As I realized I was looking for more simple houses to add to the Halloween village I wondered if this could be converted to a more Halloween style house. The is not only one piece but one color. I wanted a different color roof so I wanted to see how easy it would be to figure out where to make the color changes for the roof. It is actually fairly simple. The roof pieces for the slants are created through increases there is also a rectangle section of roof. What they all have in common is they all start with increases. If you change color at these areas and follow the really great pictures the designer has included of the one piece flat house section prior to being sewn together it is amazingly easy to figure out where to change colors.
To create the look I wanted I pinched the roof and house edges sewing them in place. I also crocheted a door and windows. The gingerbread pattern uses holiday buttons. I actually wanted more Halloween themed buttons but I just haven't been out to find them. I did add a few pumpkins I had left over from previous projects. I also crocheted a chimney to add to the roof. It seemed to need one.
I found another free Christmas house pattern I'm hoping to convert. We shall see what happens.
Wednesday, March 25, 2020
Bunny with Carrot Dress
I found the bunny for the Easter Project and finally finished the first one. The bunny pattern is called Dress Me Bunny and is free and found here. The blog has several different free patterns you can use to dress the bunny once you make it. I chose the Carrot Dress found here. The outfits do include overalls if you don't want a dress for your bunny.
As I was working my way through the pattern I decided I didn't want to have floppy legs so I reworked the pattern to split the legs and add on the feet.
When I make the second one my plan is to make the two legs and crochet them together to the abdomen level and then crochet the head and torso and join that way. It is a better solution than the one I made for this bunny. The gloppy legs of this pattern are a great option, I just wanted my bunnies to have the ability to stand.
I used an e hook with worsted weight yarn to get a smaller bunny. The bunny is by no means tiny, but had I used a g hook it would have been larger. I still had to use an I hook to get the dress to fit on the top. When I make the dress again I'm thinking about reducing to a smaller hook once I get past the dress fitting the tummy so it doesn't flair out quite so much. I do like the pockets on this dress. I'm on the fence about whether I'll add the collar to the next dress. I didn't think I'd like it with the orange dress, but it did look nice in the maroon version so I'm considering what I want for the second bunny.
The carrot purse and carrots worked out according to directions and I used an e hook for the purse and a D for the carrots.
I added extra rows at the 30 stitches to help the shoes fit the feet. I suspect this has to do with how I constructed and stuffed the feet. I then reduced stitch count and finished as described.
Easter is fast approaching and I need to finish off my projects.
Wednesday, February 19, 2020
Baby Doll Lula Gown
I discussed this pattern previously in the Baby Doll Day of Play post. I adapted a premi pattern that can be found here.
My first attempt at this project didn't work with a lighter weight yarn. It was just too tight for the baby doll. I have written quite a bit about my mission to attack my orphan stash yarns and this project fit right into that mission. While looking through my stash for an orphan yarn to use for this project I came across a single skein of Herrschnerrs Bulky 5 weight yarn. I went to look it up but they don't actually carry this yarn any longer. While it is a 5 weight it isn't your typical bulky yarn. While slightly heavier than a 4 it is no where near what I normally think of as a 5 weight. It worked out well for this project.
I used an f hook for the top of the dress and an I hook for the bottom. I sewed the seem up the back of the dress leaving an opening that was closed with a snap at the top. I made a chain 3 trim at the top and bottom of the dress with variegated yarn to add a little color.
There wasn't enough yarn to make the shoes so I grabbed another orphan yarn ball of purple to make shoes. The pattern is the Peachy Keen one you see often sighted here on this blog here.
I had a little bulky yarn left over and I was determined to use it up so I started a hat and finished it off with the orphan yarn I used for the shoes. I don't have a pattern for the hat. I've been making them for a while and it was primarily an increasing circle with a shell pattern brim. I increased the hat until it was big enough for the head and then made rows of alternating sc and hdc until the hat was long enough. Then I used shell patterns to make the brim.
Wednesday, June 23, 2010
Wolf Amigurumi
After choosing her graduation project, I decided to ask my niece what she wanted me to crochet for her birthday. The date was close to her graduation party so it seemed like a good time to deliver the birthday gift. I was figuring she would choose one of the scary creatures she had been looking at during a recent visit. Instead, out of the blue she asks me for a wolf. I knew I had not seen one in my books. I head to the toy page, pretty sure I have never seen a wolf there either and sure enough, no wolf. I finally located one and there are now two on the toy page for those who are looking for free patterns. The one featured here is the Lion Brand pattern.
The Toy Blog Page has many free pattern links for anyone looking for new patterns to try.
Wolf was a hit although his still lacks a name. He was known as "Pocket Wolf" during the graduation party as he hung out in her pocket for the duration of the party. I suspect he will soon become a car wolf.
Picture may not be used without written permission.
Subscribe to:
Posts (Atom)


