Showing posts with label Crochet Farm Finger Puppets. Show all posts

Thursday, October 29, 2020

Rooster Finger Puppet


Finally we come to the last finger puppet from Leisure Art's Busy Baby Boxesfarm set.


The only real challenge I had with this project is the wings called for variegated yarn and what I found is most of what I have is actually striped not variegated which made getting consistant coloring challenging.


Wednesday, October 28, 2020

Cow Finger Puppet


The cow was slightly more complicated to finish in that he required multiple weights of yarn to finish his face. The previous puppets required just a little scap of cotton sport yarn for the details but I found as I tried to make the spot for the cow's face with acrylic worsted yarn it covered his whole face. So I pulled out the cotton sport yarn and made his face and muzzle with cotton sport and DK yarn. By using multiple weights I got the face to fit and all was well in the world.


Thursday, October 8, 2020

Busy Baby Box Farm Activity Cube Side 3


I'm continuing to work on finishing the Farm Activity Cube found in Leisure Arts Busy Baby Boxesthat I've been writing about for several weeks now.


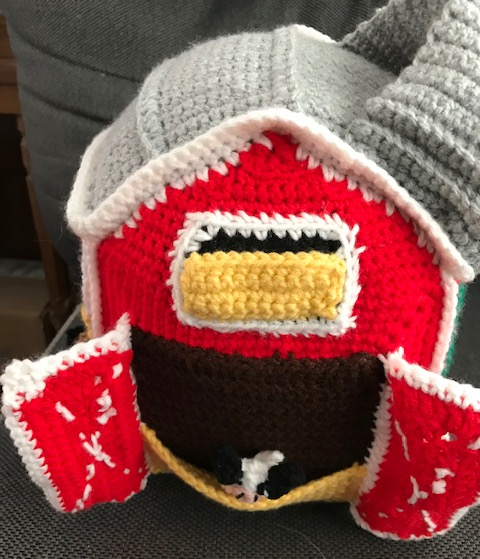
This side reminds me of several barn projects I've made previously with the hayloft and the hay hanging out of it. I do love the pockets for the various finger puppets. Those are still on my to make list once the sides are made. The remaining sides are the most complicated. I didn't choose to leave it that way. For once I decided to follow the directions. I've been completing the sides in the order suggested by the designer.

Thursday, September 17, 2020

Busy Baby Box Farm Activity Cube Frame

I made the squares for Farm box found in Leisure Arts Busy Baby Boxes back in the summer but while the pattern doesn't call for it I wanted to back the squares with plastic canvas to make the box a little stronger. This required ordering plastic canvas and that took me longer to get to and thus I finished the frame for the box this week and wanted to post my progress and notes for future reference.
I edged the plastic canvas squares before sewing them to the squares. I learned this trick when making the castle I wrote about earlier. Plastic canvas has a way of edging through crochet sometimes but if it is covered in yarn it isn't an issue. Sewing them on was not an issue from there. I did not line the roof pieces. The roof is the one area of the busy box that doesn't have any attachments. The red loft area does have some windows, but I'm not worried about these needing additional backing. I believe the structure should be solid with the base provided.
The premise of a busy box is that it provides young children with activities on the box to keep them amused. Each side generally has something different for the child to explore. The one exception as I mentioned above for this box is the roof side. Most of the boxes I've seen are flat on all sides. One of the things that drew me to this project was that it was more than a box. The farm theme has been popular and I thought sacrificing one activity side was worth it to continue the farm theme.
After sewing the plastic canvas to the sides I was concerned about assembling the box but that proved to be easier than expected. The directions are clear and used for both boxes in the pattern set.
This leaves me with five sides of the box to decorate and five puppets to make as I made the chicken over the summer. I think this is doable with my deadline. The big hurdle was finishing the box.


My box is not as wide as the box pictured I believe because of the plastic canvas which I preferred. I wasn't crazy about the overstuffed look in the book's pictures.


Tuesday, August 18, 2020

Chicken Finger Puppet


I started working on Leisure Arts Farm Box from Busy Baby Boxesand I finished all the squares. Looking at the project and seeing some other projects in progress from people who had made the box, I decided I wanted to line the squares I made with plastic canvas before assembling. The only challenge is plastic canvas is not the hobby it once was and therefore stores are not stocking it the way the once were in previous times. Therefore I will need to order it before I can continue on with that part of this October birthday project as I've depleted my supply.


So I moved on to the finger puppets. These are rather unique puppets. For the most part when I've made finger puppets they are made in sc in rounds to form the body casing. I won't give away trade secrets but these are very different and much quicker to assemble. When I finish the farm animals I want to add the princess from the other cube project to the castle I'm making for Christmas.


I used an H hook and worsted weight 4 yarn to complete this project. The trims were made with a combination of worsted and sport weight scraps.


Monday, February 11, 2019

Crochet Barn and Farm Animal Finger Puppets


I needed a project to send out as a Valentine's present for a little one and I really wasn't it the mood for traditional Valentine's toys. Since I'd made the Down on the Farm for her birthday and the Farm Cilo Bag for Christmas I decided to stick with the farm theme.


I actually picked this pattern up in 2 places Best Crochet Animals, Toys & Dolls and the DVD Crochet World Collection. However if you don't happen to have either of those you can buy the single pattern at e-pattern central here. The pattern isn't terribly expensive, but if you get on their mailing list you will find they have amazing sales all the time bringing their patterns down to as little as $1 at times.

Notes for making the barn which I hope to do again.

I lined the entire farm with plastic canvas to help it be more of a play toy for little hands. I did two layers for the short sides and sewed plastic canvas between them. I found I was unable to do a double layer for the long piece which makes the roof and larger sides of the house, so I sewed sections of plastic canvas to each separate area to help the section hold its shape. I found this gave the barn more stability.

While I left a margin around the edges for sewing I'd make it larger next time for the trim and other items required to put the barn together. I added black around the roof after I'd sewn it together, as the original pattern did not account for having two sides of plastic canvas. This made things a little tighter but worth the need to add as the stability was greatly improved with the additional plastic canvas.


I then decided I needed more puppets. I do get carried away with these projects. I found the next set of patterns as a free pattern here. These are slightly bigger but more detailed finger puppets. These were my favorites.


Last I turned to one of my favorite finger puppet sets to find a horse only to find as I wrote this the link had moved to Interweave Crochet. The horse is part of a free set of fairy tale finger puppets and you can find the set here. I have made this set many times over the years. The dragon and the knight have been particularly popular.


Once finished I packed them all in to make sure they'd fit as the box was only designed for the original animals in the pattern.


I'm a huge fan of adding books to presents and for the holiday packages I try to go seasonal.

Search This Blog

Blog Archive

Followers